Showing posts with label Reginas Printable Stamps. Show all posts

Friday, March 16, 2012

Have You Got Your Green On?

Happy Friday!
Yay, we made it to yet another weekend. I love my weekends and always look forward to reaching them.

So tomorrow you have to make sure you're wearing some green so you won't get pinched! Heehee!  Do you celebrate St. Patrick's Day?  I decided not to decorate for St. Pat's Day this year and just moved right on to Easter.
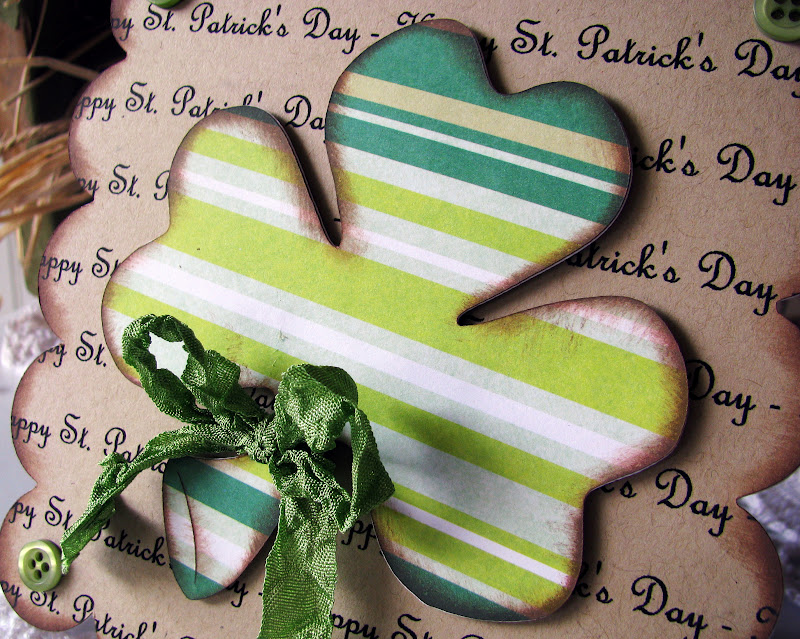
I did however decide to create a pretty little shamrock card to send to the kiddos so they know we are thinking of them.
This awesome St. Pat's Day back ground is from The Cutting Cafe'.  I used some Kraft card stock to print it on.  I just love how it turned out.
The shamrock was cut out using my Cricut Expressions and the Paper Doll Dress Up cartridge.  I tied a bit of green wrinkle ribbon on the stem to add a bit more dimension.  I love wrinkle ribbon!
The kiddos should have their card by now and hopefully enjoying it.  I bet they may have learned a little something in school about St. Patrick's Day.  I can remember we did and I also remember if you didn't wear green...the boys would pinch you for sure! :)

Thanks for stopping by today. Please come again really soon, but until then...have a lovely day!  HUGS! :)

I'm linking to:

4 You With Love

Pin It!

Monday, January 30, 2012

Recycled Heart Flower

Happy Monday! 
How was your weekend? Lovely I hope! Mine was wonderful, it just didn't last long enough..but they never do now do they? LOL!

Today's card was created using some of my bill envelopes I've collected.  I have oodles and gobs of them so I decided to put a few of them to use!
I used a Kim Hughes stamp (the heart shape) and stamped four of them onto one of my envelope designer papers, cut them out and then free handed the stem and leaves and traced around them with a black Zig pen.  Then I mounted them onto another designer paper.
I even used a sweet set from The Cutting Cafe' called Hershey Kiss Valentine Bottoms.  I just decided to use them as my sentiment instead of on the bottom of kisses.
Have you ever stopped to notice the different designs inside your bill envelopes? Well, then you have lots of designer papers being delivered to your mailbox every day, go find you some!
This little red, black and white number is for sale in my Etsy shop, but hurry, Love Day is drawing near and there isn't much time left for shipping!

Thanks for stopping by today. Please come again really soon, but until then...have a lovely day!  HUGS! :)

Pin It!

Monday, January 9, 2012

More Mustache Humor

Happy Monday!
I hope your weekend was an awesome one!  Mine was, I got lots of crafty stuff done and I even tried a new recipe I found on Pinterest and it was so delicious, you should try it too!

Today's card is more of my mustache humor.  I am hooked on mustaches right now.  They are every where too!  This one is a Valentine and its available in my Etsy shop if you're interested!
I used some K and Co glitter paper for my heart. I cut it out using my heart shaped Nesties then added the 'stache!
My sentiment is from The Cutting Cafe'.  The set is called All About Valentine's Day.  I just printed it out and then cut it out with my Nesties and then traced around the heart with red marker.
I added a bit of dainty lace trim for a little girly factor, then topped it off with pearl dew drops.
Keep watching, I have one more mustache card coming to show you, but if you can't wait to see it...go take a peek into my Etsy shop.

Thanks for stopping by today. Please come again really soon, but until then...have a lovely day!  HUGS! :)

Pin It!

Friday, January 6, 2012

I Love Snow People!

Happy Friday!
I know its way past Christmas now, but I couldn't resist showing you one of the cutest little sets over at The Cutting Cafe'!  The set is called Frosty and Penguin in Snow Globes. It comes in black and white so you can color the image or in full color like the one I used here. If you haven't visited Regina over at The Cutting Cafe', please do, she always has such FUN sets and for reasonable prices!
Isn't the image just so sweet?  All I did was print it out on white card stock and then cut it out with my circle Nesties and of course I free handed the bottom base part. Easy peasy!
Since I had the pink girly theme going on, I decided to add tiny pink crystals to the snowflakes. FUN!
I also made a little pink bow using some of my pink variegated wrinkle ribbon and a vintage button all tied up with baker's twine. I love wrinkle ribbon!
I sent this card to my very special friend who is my biggest fan and cheerleader, Sherri.  You should stop by her blog and check out her awesome work, in my opinion, she's the best when it comes to Copic coloring, but I'm not biased or anything! Heehee!

Thanks for stopping by today. Please come again really soon, but until then...have a lovely day!  HUGS! :)

Pin It!

Monday, December 26, 2011

A Freebie from The Cutting Cafe'

Happy Monday! 
Did you have a wonderful Christmas? We sure did!  We spent Christmas Eve with my sweet Mama and then Christmas Day was spent at home just relaxing and enjoying each other.

Today I'm working with The Cutting Cafe' goodies! Also, you can sign up for a chance to win a free set from The Cutting Cafe'.  I'll be giving away an oldie but a goodie, the Gift Card and Money Holder Set.
I recycled on this card.  The black and white background paper is the inside of a bill envelope.  Isn't it a lovely designer paper? Best of all...it was FREE!
The mustache cut out, I got HERE.  It was free too! YAY for free when you are creating! Pinterest is my friend!
I got the saying idea from Pinterest too.  THIS little project got my juices flowing! So adorable I must say!
I stamped Merry Christmas on the back flap for a little sweet message before they open the flap and find the good stuff inside!  Oh and the little green sprigs of fern are made by using my Martha Stewart punch and then adding some tiny glass beads for berries. Close up in the next picture.
This is another free patterned paper.  It's the most popular of my giant collection of bill envelopes.  Also, see the ric-rac trim.  I made that using a strip of red and a strip of white polka dotted ric-rac and wrapping them together.  Uuumm, yeah, Pinterest idea again! Look HERE for my inspiration!
Lastly, just tuck in a few bills and you have an adorable gift that everyone will love!  I suppose I should have decorated the back too, but I was in a bit of a last minute time crunch and I did not this time.

Please be sure to leave a comment so you will have a chance to win on Saturday, New Year's Eve when I draw a lucky winner! Good Luck!

Thanks for stopping by today. Please come again really soon, but until then...have a lovely day!  HUGS! :)

NOTE: The Cutting Cafe' is having a Cyber Monday sale today! Check it out HERE! 

I'm linking up with:
Passionately Artistic

Pin It!

Monday, December 19, 2011

Rain Rain Go Away

Happy Monday!
We had the most awesome weekend, my youngest son and I went shopping on Friday and then we had Christmas at my Daddy's and Step Mom's house with all the family on Saturday!  So FUN!

Today's card is done using a really fun set from The Cutting Cafe'.  The set is called Rain Rain Go Away.  It's very fitting with all the rain we've been getting here in Texas lately!  Boy did we need it though!

Pin It I printed out the rubber boots onto yellow card stock as well as the sentiment.  I fussy cut the boots out and then used my heart shaped Nesties for the sentiment.  I used some clear rhinestones as rain drops. I love lots of bling!
I really like that font Regina used for the sentiment.  It seems to go so well with my card today!  I used my Copic markers to color in the flowers and then added more rhinestones to finish them off.  Lots of sparkle on this card!
This set comes with lots of different  images and sentiments.  You could make all kinds of cards with this set!
I think I will add this card to my Etsy shop because Valentine's is right around the corner and this would make a perfect Valentine Day card for sure!
Pin It Before I go, I wanted to show you my Grinch nails that I did on Friday night! Aren't they fun?  They are basically like my Santa nails, just different colors and no Grinch face.  I wasn't even going to attempt that one! LOL!

Thanks for stopping by today. Please come again really soon, but until then...have a lovely day!  HUGS! :)

Pin It!

Monday, December 12, 2011

2012 Is Just Around The Corner Now!

Happy Monday! 
I hope your weekend was wonderful for you. I got some shopping done, cleaned and did laundry, baked a little and got some cards made! YAY Me! lol!

Today's card is a fun one to say the least.  I even busted out the ole doodling technique on this one!  This New Years card was made completely of scraps from my scrap bin!

Pin It The 2012 background and the circle sentiment are from The Cutting Cafe'.  The sets are called 2012 Background set and It's New Year Time.
All the words of a New Year celebration right here on a circle.  After I printed the sentiment on Kraft card stock, I cut it out with my circle Nesties, then backed it up with a black scalloped circle.
I love when Regina makes the number or word backgrounds and incorporates them into her sets.  Its so much like subway art and I luvs me some subway art!
This card is for sale in my Etsy shop if you wanna send someone a fun card for the New Year!  Keep watching, I'm still making more New Years cards!

Thanks for stopping by today. Please come again really soon, but until then...have a lovely day!  HUGS! :)

Pin It!

Wednesday, December 7, 2011

Pretty Poinsettia Tag

Happy Wednesday!
Baby it's COLD outside! Brrrr! We've had snow already this week and some very cold temps to go with it! It's definitely winter here in Texas!
Today I have another fun little Christmas tag for you.  I used a sentiment from The Cutting Cafe' set called December Daily 2.  It's loaded with FUN! Please do go check it out!
I printed it out on Kraft card stock then cut it out with my Nesties, added a few red rhinestones and then topped off my tag with it.
I made the ruffled center piece by cutting a strip of the poinsettia paper.  Then using one of my Martha Stewart punches, I punched along one edge.  Then I carefully scored in between each scallop, folded back and forth and then glued it to the scalloped piece of card stock you see behind it.  Lastly I centered it with a vintage button.
You can make these without using the punch along one edge, but I think they are really pretty with it and it also gives you an easier guide for your scoring and folding.
These are simple to make, but look a bit elegant when you are finished in the end.  I made two different sizes and both are for sale in my Etsy shop right now!

A beautiful tag can dress up a plain bag or wrapped gift and make it so much more special to the receiver.  I can imagine using this tag on a plain Kraft paper bag or maybe even a gift wrapped in the brown shipping paper. That would be GORGEOUS under the tree!

Thanks for stopping by today. Please come again really soon, but until then...have a lovely day!  HUGS! :)

Pin It!

Monday, December 5, 2011

Snowflake Gift Pocket

Happy Monday!
How did your weekend go? Mine was cold and rainy, but I'm not complaining at all!  We most definitely needed the rain and its about time it got cold!
This week over at The Cutting Cafe', Regina  asked the design team to use the new Christmas Pockets file to create our projects.  This is mine.  It would be perfect for a small gift or money or even a gift card....or 2 or 3 gift cards! Heehee! It's a nice size.  It measures 5" x 5".
Pin It I used my Pazzles machine to cut out my pocket.  The file cuts out the scallops and the snowflake, then I added the holes on the scallops and then cut out a circle of pink polka dotted paper to use behind the snowflake.
The sentiment I used is from the Snowman Shaped Card Set.  I used my Printmaster program to change the color to match my project.
I had these little Christmas charms in my stash and this snowflake had a blue center, so I covered it up with a red rhinestone to match my big red bow.
I added lots of vintage buttons and some dew drops along with some punched snowflakes I made with my Martha Stewart punch. I love that punch a lot...I do!
I have this little yummy for sale in my Etsy shop along with lots of other goodies for the holidays.  Please stop by and take a look!

Thanks for stopping by today. Please come again really soon, but until then...have a lovely day!  HUGS! :)

Pin It!

Monday, November 28, 2011

Snowman Goodie Box

Happy Monday! 
I hope your long holiday weekend treated you well! Ours was AWESOME!  Of course I wouldn't have complained if it were a little longer! Heehee!

Today's project is a fun one! This little guy fits right in at my house right about now.  Snow people officially took over residence at our house on Friday! I love snow people and I have quite the collection...they are literally everywhere you look!  This sweet little guy is one of Regina's cut files over at The Cutting Cafe'.  I had the best time "building" him!  The set is called Snowman Treat Box and he comes with 2 different hats as well as all the layers you see here to build him. FUN!
Pin It I used rain dots for his eyes and buttons and some Martha Stewart glitter for the "snow" on his hat.

I haven't found what I want to put inside the little box behind him, but I'm sure I'll need him for something before Christmas gets here!
I used Kraft card stock for the base so it would be nice and sturdy to hold up to whatever I decide to put inside this cute little goodie box.
Doesn't he just make you SMILE?  He's so adorable I can't stand it.  I may need to creat another one using the Santa hat that comes with the set.  Oooooh, maybe a lady snow person this time! Too much fun I tell ya!

Please be sure to visit Regina over at The Cutting Cafe', she's got a SALE going on right now you don't want to miss!

Thanks for stopping by today. Please come again really soon, but until then...have a lovely day!  HUGS! :)

Pin It!

Monday, November 21, 2011

Christmas Tags

Happy Monday!
It is so fun to create Christmas Tags! I had a request from one of my regular Etsy customers to make some Christmas tags, so that's what I did!  I used The Cutting Cafe's set called December Christmas Daily for the little "sentiments" on them.
I also used my Cricut Expressions machine and some of my Christmas cartridges too. I had lots of fun!
I just used scraps of holiday paper from years past and put together whatever I thought looked cute!
I also used some baker's twine for the tassels on top of each tag, just in case they needed to be hung from a gift or package of goodies!
Of course I couldn't resist using some of my old book pages again, just love the look I guess!  So, be sure to get on over to The Cutting Cafe for lots of Christmas fun, Regina has some of THE cutest printables and cutouts you've seen around the web!  There are a few of theses tags left in my Etsy shop if you're interested!

Thanks for stopping by today. Please come again really soon, but until then...have a lovely day!  HUGS! :)

Pin It!

My Cards