Showing posts with label Birthday Cards. Show all posts

Monday, March 20, 2017

Elephant Wish Big Birthday Card

Hello! I recently got the Elphie Selfie stamp set by Lawn Fawn and I just can't stop making cards with it!  This sweet little guy is ready to wish that special someone a happy birthday with his balloon, birthday cake and a big wish!
I used the Elphie Selfie stamp set and the die cuts that go with it to create my card.  I purchased mine from Hallmark Scrapbook.  They offer A+ customer service and speedy shipping too!
First I stamped all my images on white card stock, then colored them with my Copic markers and then used the die cuts to cut them all out.
I used my Nesties to cut out the circles that the die cuts sit on.  I stamped the wish big directly onto the white circle.  Lastly I used some foam tape to pop up the elephant, his balloon and the cake.  The heart is glued directly to the white circle.

This sweet card is available in my Etsy store if you're interested.

Thanks for looking!  Please come again really soon, but until then...have a lovely day!  HUGS! :)

I'm Linking to THESE lovely and FUN parties!
And here are a few more too!
Between Naps on the Porch

Pin It!

Monday, April 4, 2016

Another Punny Birthday Card

This sweet little card is exactly why my blog is named Scrappin' with DeeDee.  I love to use paper scraps to create my cards, its my favorite!
I just sit in the floor, pull out my scrap bin (its huge) and I start laying papers out that go well together.  Most times I'll gather enough scraps for two or three cards and then I start creating my cards.  Sometimes I change my mind.....a lot! LOL!
I used a Paper Smooches stamp from Birthday Buddies to make this card.  I colored the images with my Copics and then added some glitter with my Wink of Stella brush. Love that brush!
This punny little card is available in my Etsy store along with lots more if you're looking for birthday cards for family or friends.

Thanks for looking!  Please come again really soon, but until then...have a lovely day!  HUGS! :)

I'm Linking to THESE lovely and FUN parties!
And here are a few more too!
Between Naps on the Porch

Pin It!

Thursday, March 24, 2016

Sweet, Bright and Happy Birthday Cards

I was looking at the inventory in my Etsy shop the other day and noticed that I needed to stock up on my birthday card selection.  I went and grabbed several of my birthday stamp sets from my collection and just so happens, I started out with Paper Smooches Birthday Buddies stamp set.  Keep reading to find out why that is so AWESOME!
I love these punny little stamps.  They are all so adorable!
This cute little bird is my favorite out of all of them though!  I always use my Copic markers to color the stamps and of course that's always lots of fun too!  I used my Nesties to cut out the ovals.  There is a layer of foam tape between the white and pink oval for dimension.
This card is a standard sized card measuring 5 1/2 x 4 1/4.  I used a distressing method on the edges of this card that I havent used in ages.  I actually used a fingernail file to distress it all the way around. See how it gives a white border on the very outer edge?
Next up is this cute little pup.  I love how he had a patch around his eye.  He says, "Happy Bark Day!"  This card is also a standard sized card measuring 5 1/2 x 4 1/4.
Again I colored him with my Copics and then used my Nesties to cut out the ovals.
This card is way simpler than the birdie card, but I think sometimes simple is better.  They look so crisp and clean when they are simplified.

Paper Smooches, Kim Hughes to be more specific, that's who designs these cute stamps I used to make these two cute cards.

Turns out after I had posted the puppy card to my IG feed I noticed that Paper Smooches was having a contest where you can win $50 credit to the PS store or be a featured designer! How cool is that?  It never hurts to try, so here I am, throwing my hat in the ring.  Wish me luck!


Thanks for looking!  Please come again really soon, but until then...have a lovely day!  HUGS! :)

I'm Linking to THESE lovely and FUN parties!
And here are a few more too!
Between Naps on the Porch

Pin It!

Wednesday, January 21, 2015

Simple Guy's Birthday Card

This is a very simple guy's birthday card using all scraps. I made this one for my guy's birthday this year.  I don't think the scalloped heart is too much, do you?
I just grabbed some matching blue papers from my scrap bin, cut them into strips and glued them to the card base made of Kraft card stock.  Blue is my guy's favorite color, so the color choice was easy.
The Happy Birthday stamp is a Kim Hughes stamp that I've had forever and I love it and I use it ALL THE TIME!
The heart is made using my Nesties and a page from an old hymnal I have.  Love using the old book pages on my cards.  I placed the heart on the card with some foam tape to raise it up off the card base a bit.
He loved it of course. Guy cards are hard to do and not make too frilly, but I find that simplicity is best when creating a card for guy.

Thanks for stopping by today. Please come again really soon, but until then...have a lovely day!  HUGS! :)  

Pin It!

Saturday, October 20, 2012

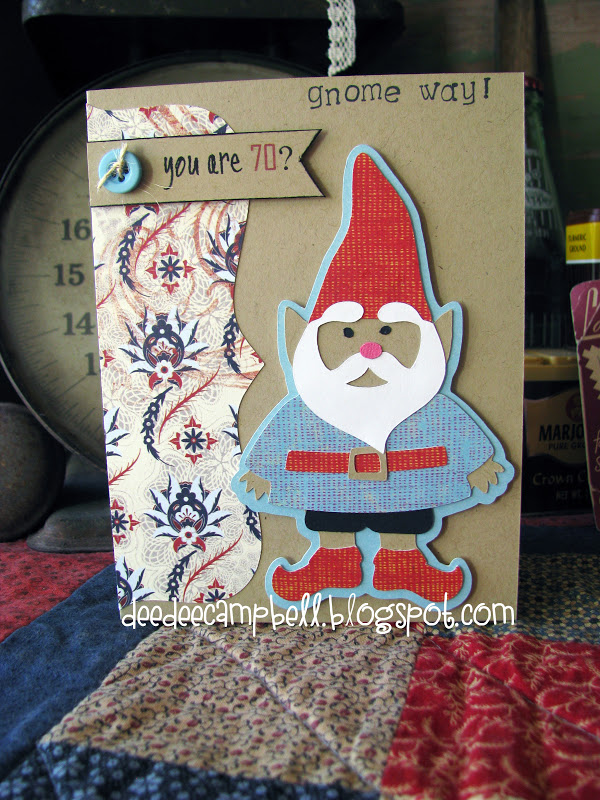
Gnome Way! You Are 70?

Happy Saturday!
Don't you just love gnomes? I do.  I actually purchased Freshly Picked just for the gnomes! I think they are adorable.

I needed a card for my Daddy's 70th birthday and I remembered I had pinned one with a gnome on it because it was so darned cute! You can see it HERE.  Thank you Mel!
Since all the pieces were very small and not a lot of paper was needed, I just used scrap papers from my scrap bin.  Eventually I had created Papa Gnome!
I used my little alphabet stamps to spell out the "gnome way!"  I think I paid a $1 for that stamp set at Michael's many years ago and it seems like I use them quite a bit. I love the font.
For the little flag that reads "you are 70?" I printed that off on to the kraft paper using my Printmaster program and my printer.  That little trick I leaned so very long ago certainly comes in handy almost every time I create a card!
My Daddy got a kick out of the pun on words and I was happy it made him smile on his birthday.

Sign up for our giveaway HERE!

Thanks for stopping by today. Please come again really soon, but until then...have a lovely day!  HUGS! :)

Pin It!

Wednesday, March 21, 2012

Birds in Disguise!

Happy Wednesday!
Does anyone else love mustache humor as much as I do?  It seems to be everywhere right now too!

I don't know about you, but I've never seen a bird in disguise, but I guess it could happen! LOL!  I used another one of the birds from my new Cricut cartridge, 3 Birds on Parade that I got at Hallmark Scrapbook a while ago.  I was loving this guy when I spotted him. Funny!
And the perfect sentiment I used is from The Cutting Cafe'.  The set is called Mustache Shaped Card Set.  Awesome pairing! I love when that happens!
I just printed the sentiment on some of the green paper I used and trimmed it into a banner.
Its fun to use printed papers where you would normally choose solids just for a fun change of pace and creativity!
If you enjoy mustache humor or have a friend who does, this cooky card is for sale in my Etsy shop.

Thanks for stopping by today. Please come again really soon, but until then...have a lovely day!  HUGS! :)

Pin It!

Thursday, September 8, 2011

Look Who's Turning 20!

Happy Thursday!
And..........HAPPY BIRTHDAY to my youngest son! He's turning 20 years old today and I guess even though he's not a baby, he will always be my baby!  He's smart and handsome and has the most awesome smile you've ever seen! I love you honey!

Now, for his card I used some items from an old Kim Hughes set (the owl, the branch and the sentiment)  The "20" is cut out with my Cricut Expressions and the Makin' the Grade cartridge.  That yummy orange scalloped border is from The Cutting Cafe' from a set called Fall Time Bingo Cards. I love that scalloped frame and there are several colors to choose from.
I'm still using my old book pages...are you tired of seeing them yet? lol!  I stamped Kim's sentiment right on the book page as well as the branch, it's stamped directly on a book page then cut out.  Mister Owl is colored with my Copic markers.
My son loves to sleep so I thought this sleepy eyed ole owl fit him perfectly! Heehee! Isn't he a cutie?
I finished the whole thing off with some vintage buttons, a little piece of button twine and a few rain dots.  Mister Owl, the number 20 and the whole scalloped piece is popped up off the card.

Thanks for stopping in to see me today. Please come again real soon, but until then...have a lovely day! HUGS! :)
Sign up for my GIVEAWAY HERE! 
I'm linking to:


Pin It!

Friday, August 26, 2011

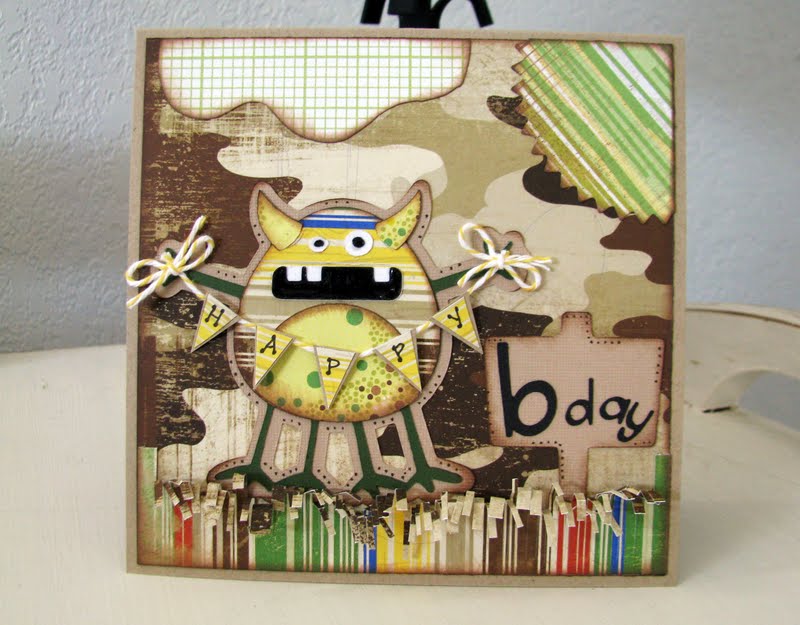
Have a Monster of a Birthday!


Happy Friday!
This is the birthday card I made for my brother, his birthday was yesterday!  Happy Birthday little brother!  I know Mini Monsters and Freshly Picked are not a new Cricut cartridges, but they are new to me! I just got mine from Hallmark Scrapbook at an EXCELLENT price. Check them out HERE! Oh and guess what else you can find at Hallmark Scrapbook right now? You can purchase the George cartridge for $48.99 and get the baby Cricut for FREE! Yeah...really! You can start your Christmas shopping early! Tell them I sent you!
I used Mini Monsters (MM) and Freshly Picked (FP) to make my brother's card.  Obviously the four legged monster is from MM and the sign is from FP.  The letters on the sign are from Cuttin' Up.
I created the pennant banner and "cloud" freehand.  The "sun" was created by using my starburst Nestie, then trimming it down to fit in the corner.  The "grass" was created by just cutting small strips into the striped paper and then bending it over a bit.
Those little monsters are hilarious and there are bunches of them for Halloween, so be watching for them to appear at a blog near you soon!
Thanks for stopping in today, please do come again really soon.  Until then, have a lovely day and an awesome weekend!  HUGS! :)
I'm Linking to:

Join  us Saturdays at tatertotsandjello.com for the weekend wrap 
 up           party!
DIY under $5


Design Dazzle

Pin It!

Sunday, August 21, 2011

Hat Bee Birthday!

 Happy Sunday!
I normally post on Mondays, but I'm posting a day early because I wanted to play along with the Celebrate the Occasion challenge this week and you must link up by Sunday evening.  I'm cutting it really close! Whew, I think I made it!
My sweet friend Sherri sent me this little stamped image and sentiment for my birthday {along with others too, thank you sweet lady!} and I just had to use it for my easel card for this challenge.  You can see Sherri's take on Ms. Hat Bee HERE.
 I colored her with Copics and I will be honest with you now.....I copied Sherri's coloring as close as I could.
 I snapped a pic of the markers I used just in case you might need that information.
  Sherri also sent me those sweet little yellow flowers, I think they are the perfect touch for this little card.
This little easel card is 4 x 4 and the perfect size to put a smile on that special someone's face!  If you need more details on the stamp or the flowers, just visit Sherri's blog at the link above and she gives all the details there.
Thank you for stopping by to see me, please come again real soon. Until then, have a lovely day!  HUGS!
I'm Linking to:
DIY under $5

Pin It!

Friday, August 5, 2011

Celebrate Good Times with a Dustin Pike Image

Happy Friday!
And.......Happy 23rd Birthday to my oldest Son!  Yes, 23 years ago I was in labor for 12 hours giving birth to my first son.  It was worth every minute of it too.  He's a sweet young man that loves his family and friends, has a kind and gentle heart and will keep you in stitches with all his jokes and impressions.  Yes, he's very funny and loves to make his Mama laugh.  I love you honey!

Now, on to his card that I had a blast putting together.  I used a Dustin Pike image and some freebies from Scrapnfonts.
I paper pieced Mr. Turtle's balloon and his shell with some matching papers.  Normally I make him an orange card cuz that's his favorite color. Even my youngest said, "why didn't you make it orange?"  Well, I don't know about you, but I've never seen an orange turtle and I wanted it to all match.....so green it is!  I think he'll still love it!
Isn't he cute? I always have so much fun coloring Dustin's images. It truly takes me back to my coloring book days...only then my Mama would have NEVER allowed me to have markers like these! Heehee!
Here are the colors I used to color Mr. Turtle.  I think I did pretty good with the shading on this image, but I'm not sure.  Let me know what you think.
I finished the card off by roughly cutting out the words and using a bit of chalk ink to highlight, then I randomly placed them along the sides of the card.  I added a few buttons and some twine and called it a birthday card.

I will be hand delivering this card later on today to the birthday boy!  Thanks for stopping by today, please come again.  Until then, have a lovely weekend!  HUGS!

Pin It!

Wednesday, July 27, 2011

Meet Ruby J Holding a Balloon from The Cutting Cafe'!

 Happy Wednesday!
The sweet Ms. Regina over at The Cutting Cafe' offered a whole set of her little girls for free!  {Sorry, it was for a limited time only}  The moment I saw the post over at The Cutting Cafe' Blog, I had to get the set and start creating with them. She's also having a contest for a chance to win more of her yummy sets. Her prices are awesome, so run on over there and grab your set so you can play along too!  Oh and when you go visit the blog link above, you'll see another one of my creations there too! Thank you Regina, you're a doll!
This sentiment comes in the set as well.  The whole set includes 3 different little girls and several sentiments to match.
This is Ruby J., isn't she just adorable? I'm not the best Copic color-er, but I try and the best part about Regina's sets is that she always gives you extra pieces in the set so you can paper piece if you wish.  I love to paper piece, and so I did here, her dress is paper pieced.
I used the cover sheet of a double-sided paper pack for my accent papers there on the side. It looks like I layered a whole bunch of pieces together, but that's how it looked already. I cheated! Heehee!
Lastly I applied the little silver star on her balloon {so it would match her dress} and added some baker's twine and I was done. This was one easy card to create.

Thanks for stopping by today. Until next time, have a lovely day!  HUGS! :)

Pin It!

My Cards